
Tuesday, November 30, 2025
SNEAK PEAK! Get ready for tomorrow's RWW!


Tomorrow's Real Wedding Wednesday features Abby and Doug. Get excited for a fairytale wedding!
follow on Twitter: thecourt_ney
DIY - Super easy way to freshen up ornaments
Maybe it's the designer in me but I love to change up my Christmas decor year to year. I tire of things easily, even if it is gorgeous the way it is. I like to give myself new eye candy. Here is an easy way to freshen up your Christmas baubles without spending a lot of time or money.
Start off with however many baubles you want to change. This will work for all different sizes and finishes.
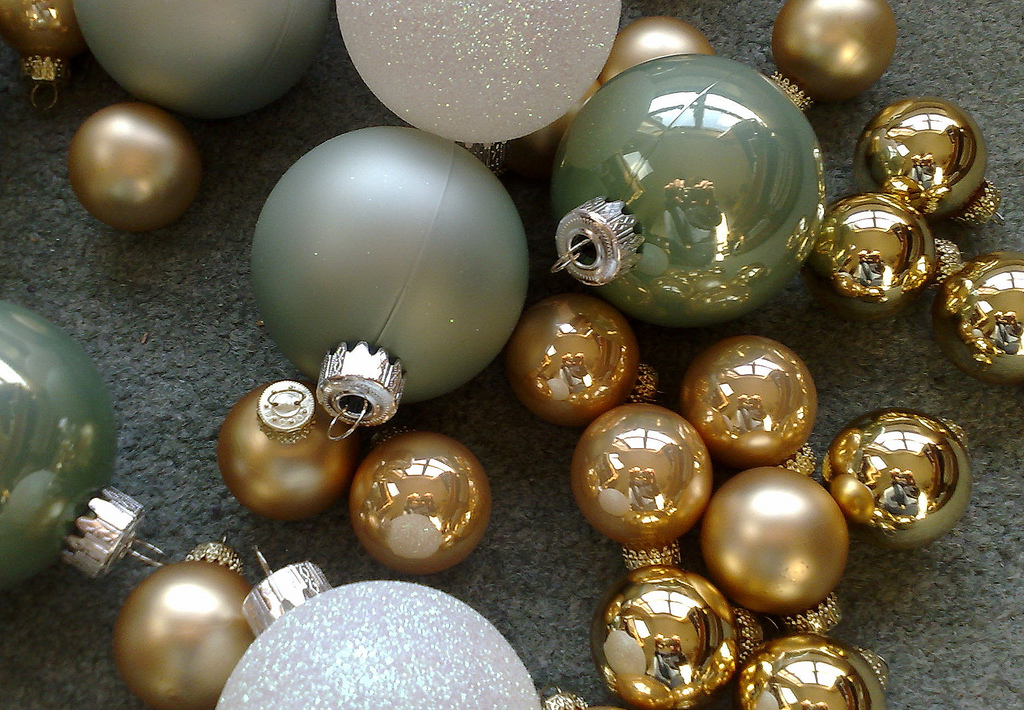
Gather different colors of ribbon. Satin, felt, or paper ribbon will work.
I also had a collection of fabric flowers. You can easily make these from old t-shirts, beads, and gemstones if you don't have any.
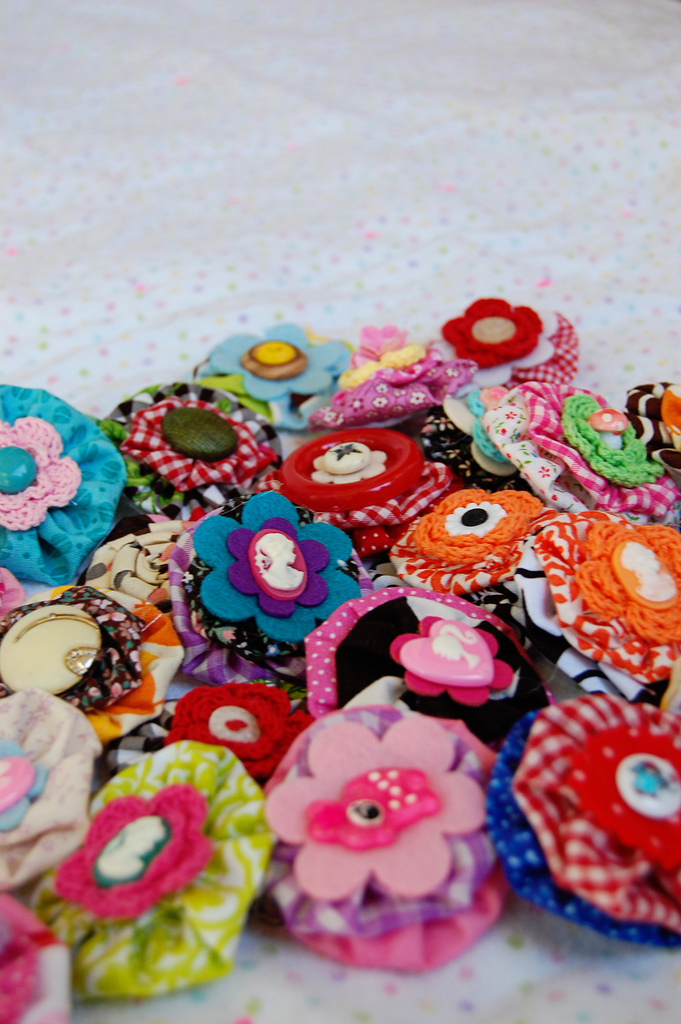
Tie a bow around the ornament. Use a hot glue gun to insure the bow stays in the spot you want. I like to leave the tails as long as the bauble. Then use your hot glue gun to adhere your fabric flowers.

image
You will have gorgeous new baubles for your tree. And the hot glue can be peeled off the ornaments next year so you can try something new!
Monday, November 29, 2025
DIY - Ornaments for your tree
I cannot resist texture on my Christmas tree. While shopping for ideas to DIY I found some gorgeous fabric baubles. When I got home I researched some ideas to make your own out of old clothes. This is the easiest idea I found.
Start with an old sweater or fleece sweatshirt. Cut about six inches from the sleeve right across so that you have a six inch tube.
Slid a foam ball into the tube and use straight pins in both ends to hold down any edges. Feel free to snip away any unnecessary pieces that make the ball too lumpy.
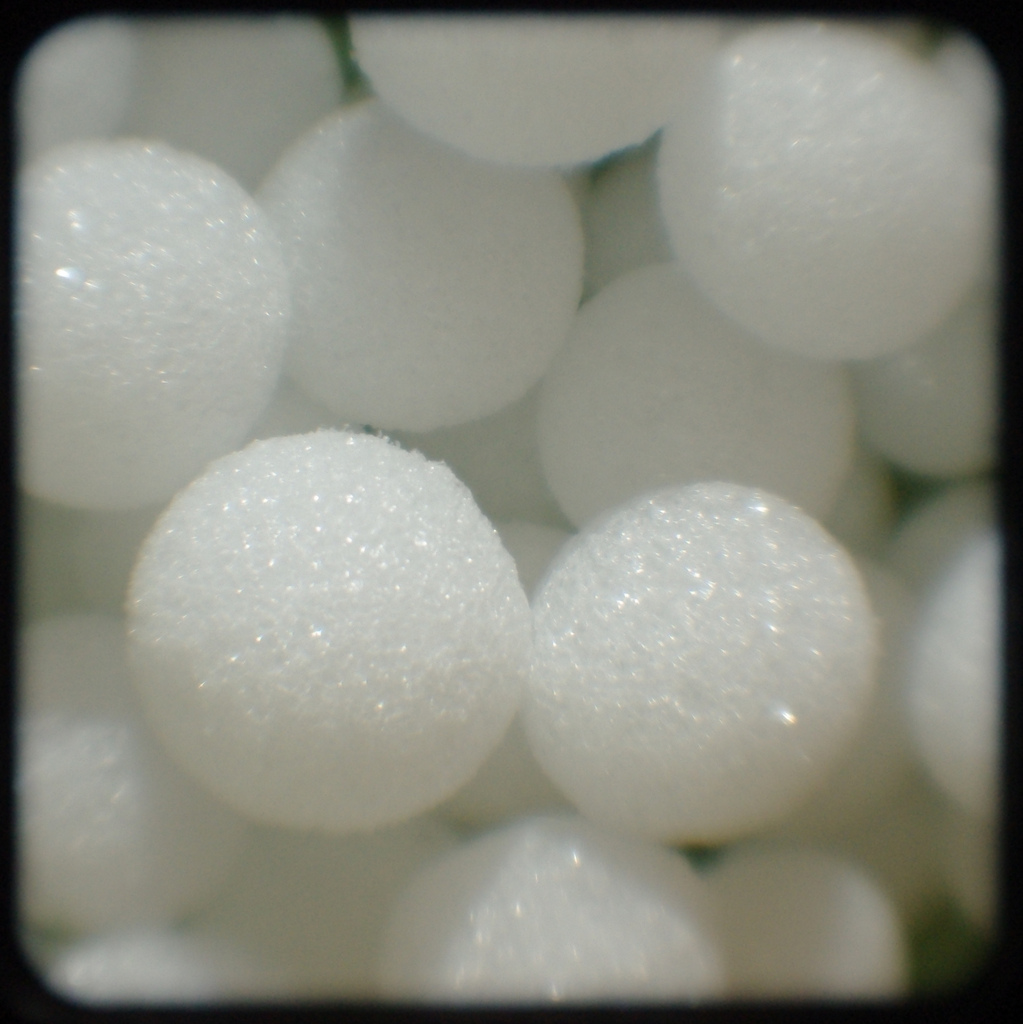
Use ribbon or felt strips around the ball to make it look like a package. You could use hot glue, double-sided tape, or straight pins to adhere the pieces. Tie a looped ribbon off one of the strips so that you can hang it off of the tree. Decorate with package bows or flowers. You can make your own poinsettia out of felt by cutting different sized five petal flowers and pinning them together so that it is layered. Use glitter pens to write a name or date along the ribbon.

follow on Twitter: thecourt_ney
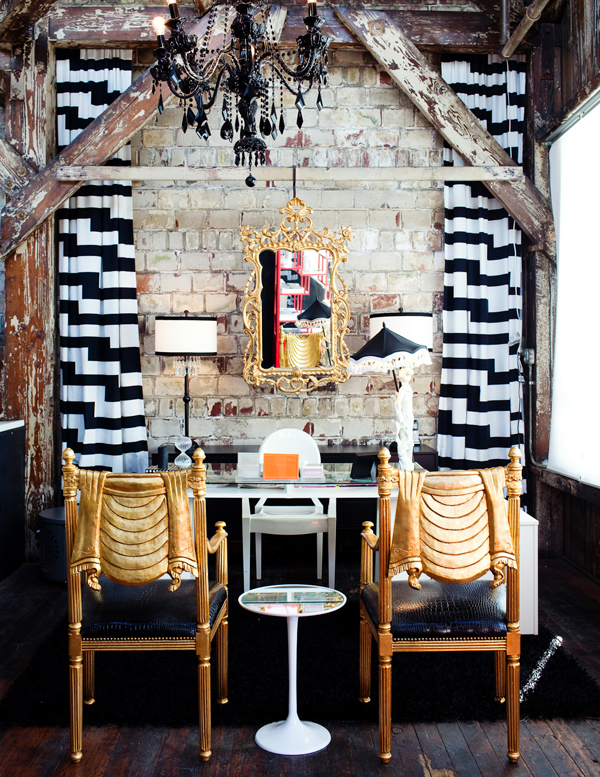
Office Space.

image via Rue.
These clear bins make a lovely place to organize. And look at that gorgeous gold tree art behind the credenza. LOVE!
follow on Twitter: thecourt_ney
Friday, November 26, 2025
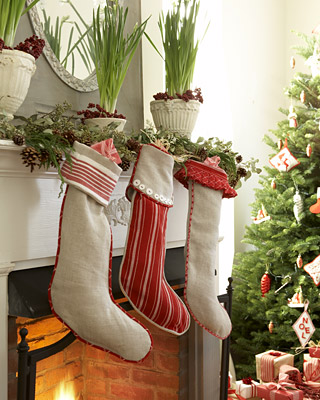
DIY- Stockings for your holiday mantel
Stockings are one of my favorite things during the holiday season. It is easy to create your own to reflect your personal style.
Start off with a couple different fabrics, one for the front, one for the back, and one for the lining. You will also need a piece of ribbon. A great stocking pattern can be found here. It looks like this...
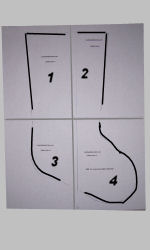
Layer your fabrics on top of each other: the front piece and the back piece facing each other and then the pieces of the lining sandwiching them facing out. Cut your pattern and lay it on top of the fabric pieces and pin everything together. Cut your fabric to fit the pattern. Remove the paper pieces.
Cut the ribbon to equal sizes, about eight inches long for each.
Keeping the fabric layered the same take your top two pieces- lining and front fabric panel- and re-pin them together. Sew these pieces along all edges. Do the same for the other lining piece and the back panel. For the back pieces, add your ribbon to the back corner so that it is sewn between the lining and the back piece. Re-pin the two new piece together in the same manner as previous. (Front and back pieces facing each other.)
Sew along the three sides of the stocking, leaving the top open. Turn the stocking inside out, so that your seam is on the inside and your fabric is on the outside. Fold out the top to reveal three inches of the lining. With a needle and thread, tack down the top to keep it in place. Do this on both sides along the seam.
For extra texture, chose a fuzzy fabric for your lining so that a nice strip of fur shows at the top.
To personalize your stocking even more, add your name in glitter. Using your Elmer's glue, practice writing your name on a piece of paper in even, thin lines. When you're ready, write the name on the stocking. Make sure not to leave any drips. Sprinkle craft glitter in the color of your choice on the glue. Let it dry for a couple of hours and then shake off any extra glitter on to a newspaper. (Then you can easily dump the glitter back into the container.)
No mantle? Paint an old branch and fix it to the wall. Tie your ribbon pieces around the branch.

Let me know if you try this out and how it goes for you!
follow on Twitter: thecourt_ney
Thursday, November 25, 2025
Thankful: Family and Friends
Today I am thankful for my family and my friends; they are the people that inspire me, support me, and push me to succeed in every aspect in life.
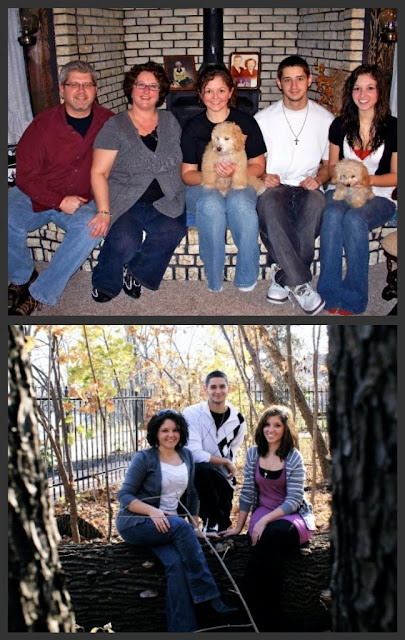
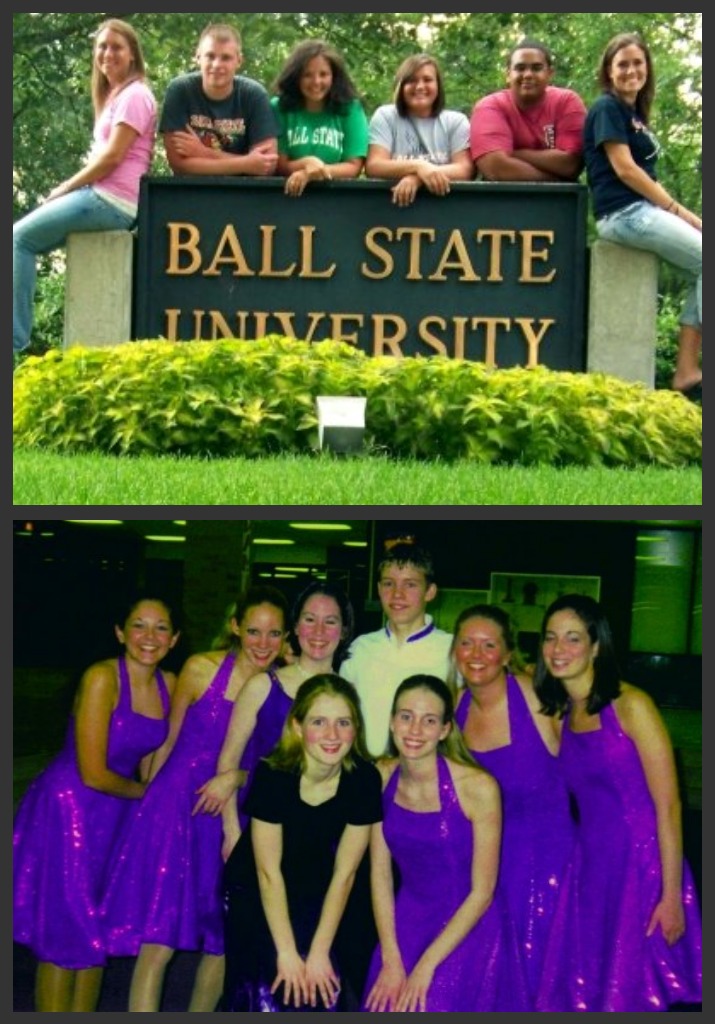
Top to bottom: My parents, siblings and me about two years ago. My siblings and me last fall. My best friends from the college years two years ago. My best friends from high school show choir eight years ago, of which I am still close.
I hope that everyone has a wonderful Thanksgiving and you tell those you are thankful for how much they mean to you.
follow on Twitter: thecourt_ney
Wednesday, November 24, 2025
Thanksgiving tablescape
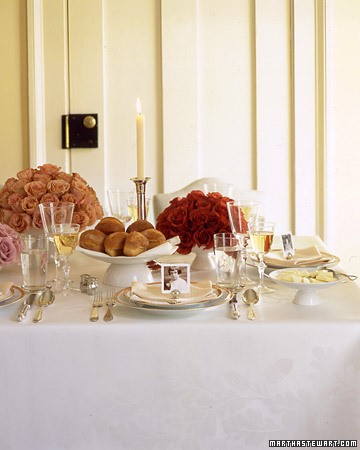
image via Martha.
A great way to lift your food or flowers up off the table without purchasing expensive dishes? Permanently create amazing platters for your food by hot-gluing your favorite platter to an upside-down bowl or teacup. Use a color that matches the plate to make it look as if it came that way.
follow on Twitter: thecourt_ney
Thanksgiving tablescape
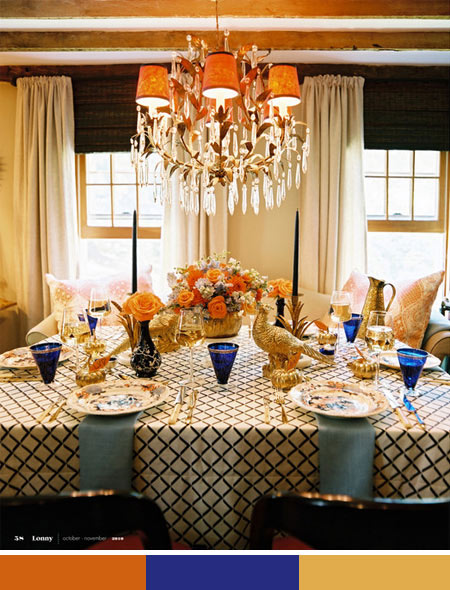
Today I must share a tablescape I came across on the creamylife blog. It is so gorgeous. Ludmila also pulled together a moodboard of the things you need to pull off this look.
follow on Twitter: thecourt_ney
Thankful: things I Love

images via: 1&2 elle decor, 3 La Vie Photography, 4&5 this is glamourous, 6 design fabulous
it may be silly to be thankful for material things, but they convenience my life and for that, I am thankful.
what are you thankful for?
follow on Twitter: thecourt_ney
it may be silly to be thankful for material things, but they convenience my life and for that, I am thankful.
what are you thankful for?
follow on Twitter: thecourt_ney
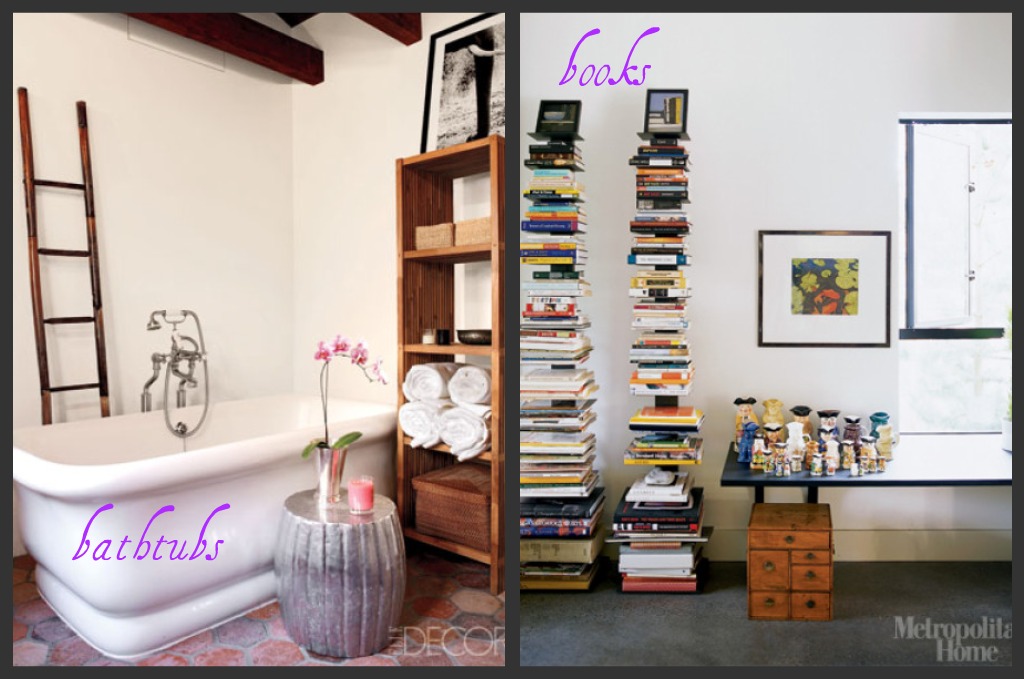
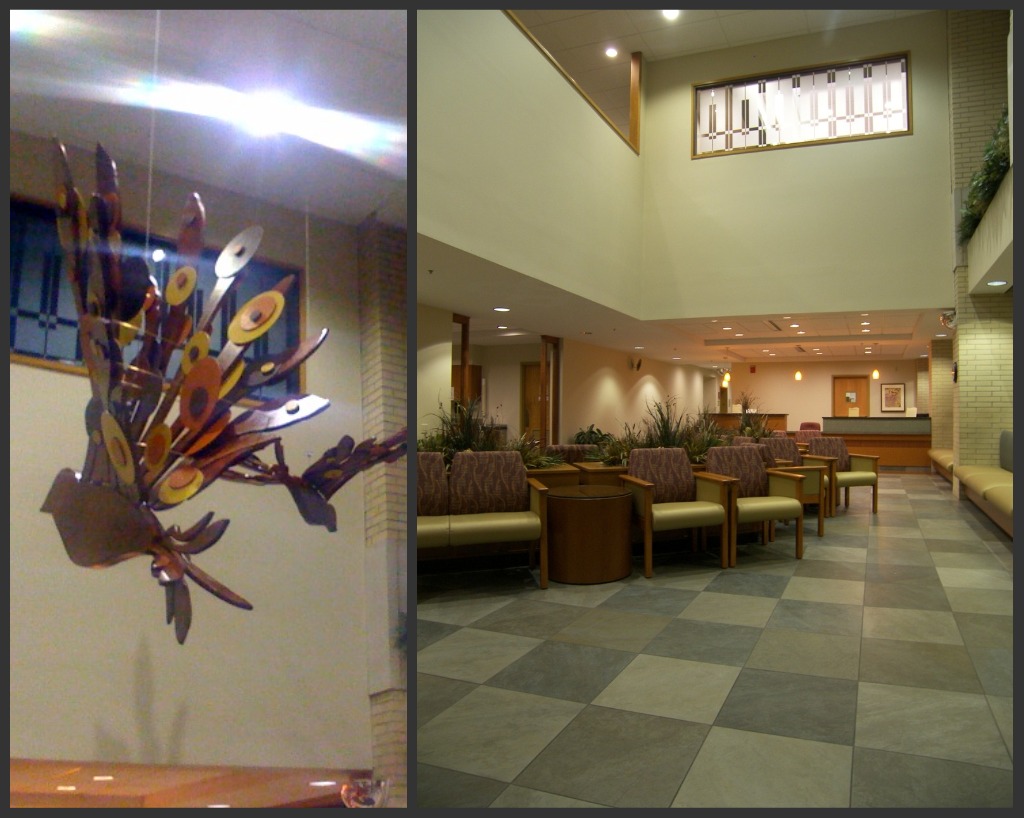
Office Space

image via LivingEtc.
stylish and sleek cubes make awesome shelves. and this beige green wall looks amazing with the white furniture.
follow on Twitter: thecourt_ney
Tuesday, November 23, 2025
Thanksgiving tablescape
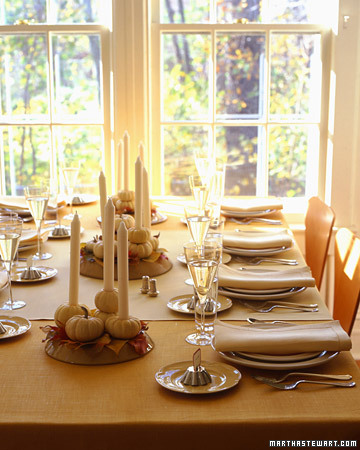
image via Martha.
Using a drill bit the size of your candle (either tapered or votive) drill out a hole in your mini pumpkin. Take it about 3/4 of the way down into the pumpkin. If you do not have a drill, use a utility knife to cut a hole and an X-Acto knife to carve it out. Or stack two pumpkins together, one all the way drilled through, the other the same as previously. Secure them together with straight pins on the bottom side.
follow on Twitter: thecourt_ney
Thanksgiving tablescape
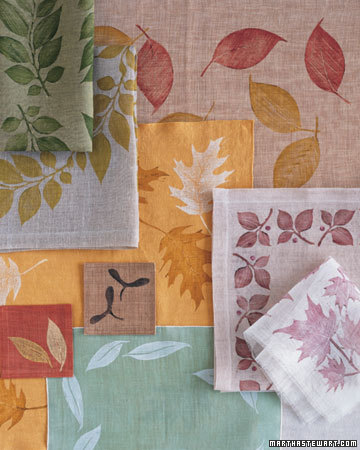
image via Martha.
Use linen placemats on your Thanksgiving table but dress them up with leave prints. Choose subdued colors like these in the photo and decide how you want your leaf print. You could do a border, a couple leaves clustered in the corner, or cover the entire fabric. A leave template can be found here, or just gather some leaves from outside. Paint them with a fabric paint and press them onto the fabric.
Not using placemats? This idea would be lovely on napkins or a table runner as well.
follow me on Twitter: thecourt_ney
Thankful: Dream Job
Today I am thankful for my amazing career. I truly am the luckiest girl in the world when it comes to my job. In college I changed my major to interior design despite the fact I knew it would be nearly impossible to get a job in my hometown where I wanted to stay. But I wanted to give design a try and I figured if I didn't really love it, I could always change my major. But I did love it and even though I knew the job market would be competitive, I stuck with it.
I was able to get an internship with the only design firm in my town, which was perfect because I could still work on campus for the summer. I loved my internship and I grew so close to the people I worked with. A year later I graduated and I applied to every design firm in the state of Indiana. But the economy had gotten worse and I only interviewed with one firm, who ended up not hiring at all. So I started working odd jobs.
Three months after graduation I got a call from Andrew who said they needed a designer right away because they were so busy. I interviewed with Jennifer the next day and received an offer at the end of the week. I gave my current employer a week's notice and started planning for life as a designer.
I truly believe that all things happen for a reason. I am so thankful for the opportunities I have had the past two years with David Dale Designs. Everyday I am challenged by a new task that keeps my mind creative and fresh- at least I hope. I work along side of people who help me and teach me; people that share my morals and beliefs.

Jennifer, Andrew, Linda, and Monica.

Jeff and Yours Truly.
My first project completed.
What are you thankful for?
follow on Twitter: thecourt_ney

Monday, November 22, 2025
Thanksgiving tablescape
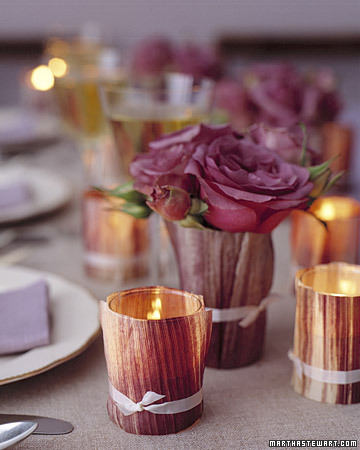
image via Martha.
Create this simple tablescape with just a few items that you probably already have in your house. Dry out corn husks from your corn-on-the-cob and wrap the pieces around a glass candle holder. These shown are votives but they could work for a variety of sizes. Tie them with ribbon or twine. Wrap the husks around flower vases as well to keep the look monolithic.
follow on Twitter: thecourt_ney
Thanksgiving tablescape
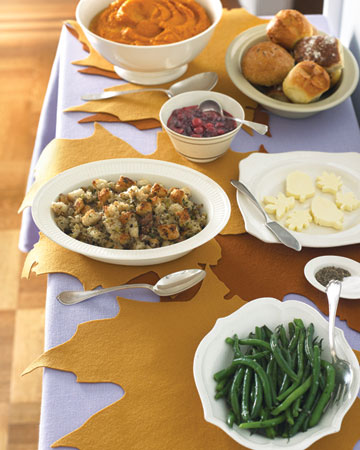
image via Martha.
These awesome felt leaves are perfect for placemats or under hot dishes to protect your table. Cut them out in all colors and sizes and scatter them all over the table. You can find a template here and just adjust the scale size on your copier.
follow on Twitter: thecourt_ney
Bed time.
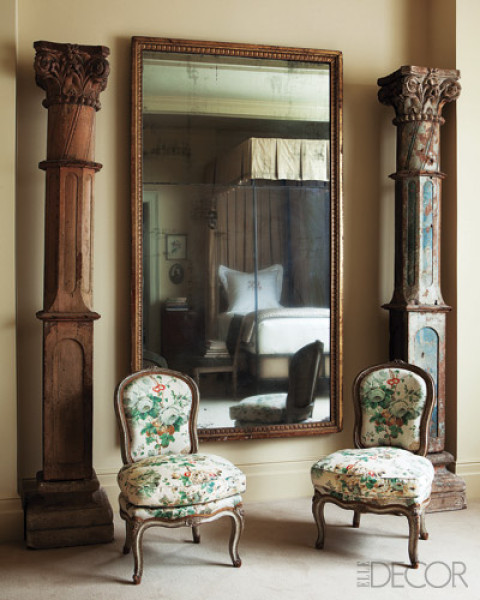
image by roger davies via elle decor.
an oversized mirror gets me every time.
follow on Twitter: thecourt_ney
Thankful: My Better Half

This week I wanted to share some of the things I'm thankful. First off: my amazing fiancé. He makes me laugh when I'm down, keeps me calm when I am stressed, and always helps me to see the other side of an issue. He is my inspiration, my motivation, and my best friend.
Friday, November 19, 2025
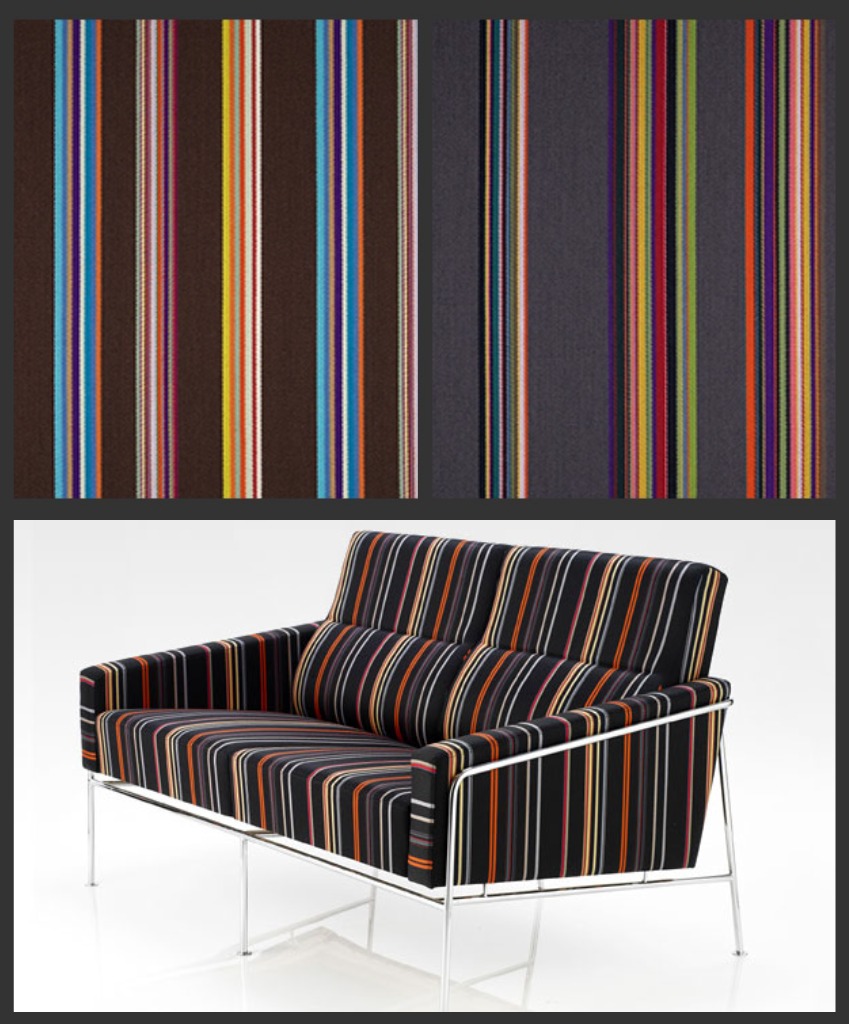
Maharam and Paul Smith Collaboration; Take 4
Exaggerated Plaid...
is the final pattern in the Paul Smith for Maharam. This gorgeous-ness is 100 percent wool, 58" wide, and surpasses 25,000 cycles. Unfortunately images are not yet available of an installation; it's that new.
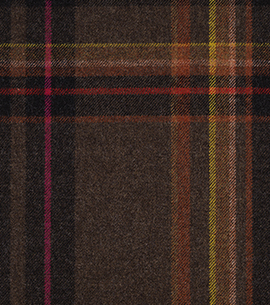
Brae
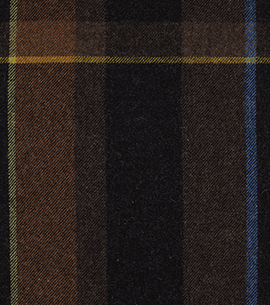
Firth
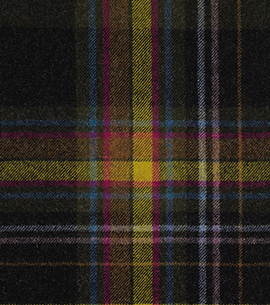
Glen
follow on Twitter: thecourt_ney
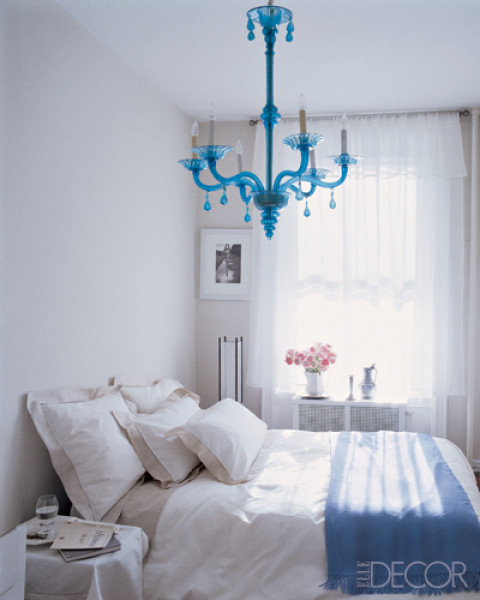
Bed time.

image by roger davies
designed by: jamie creel and marco scarani
Antique convex mirrors, vertical stripes, Louis XVI bench and gorgeous draperies makes up true bliss.
Thursday, November 18, 2025
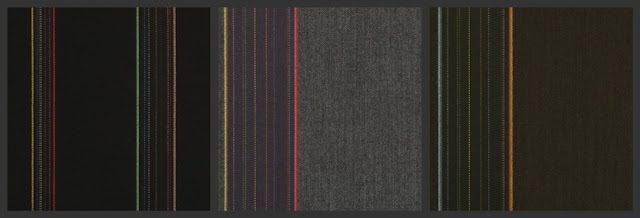
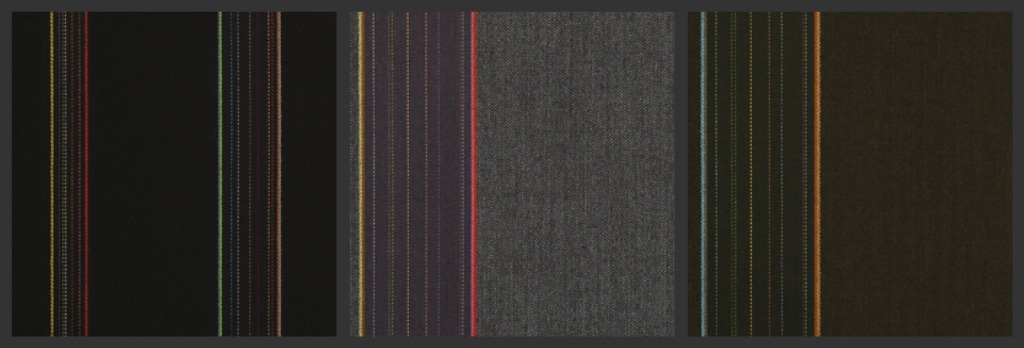
Maharam and Paul Smith Collaboration; Take III
Another day, another pattern. Today's Maharam and Paul Smith collaboration pattern is...
Stripes.
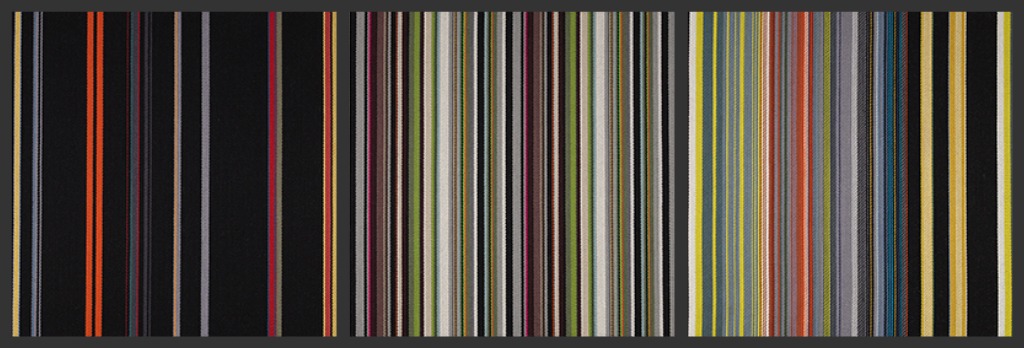
L to R, T to B: Intermittent, Modulating, Reverberating, Rythmic, Syncopated.
A sofa upholstered with Intermittent Stripes.
follow on Twitter: thecourt_ney
Loving the China
Browsing china patterns has become my cool-down period. I posted earlier this week some of my favorite gravy boats and it encouraged me to post my favorite dinnerware patterns. All of the patterns below are Lenox and I'm loving everything they are doing.
I'm not the type to purchase all one pattern. I will most likely confuse my guests when they see one set of each of these patterns listed. I like to keep things whimsy. Enjoy the eye candy :)
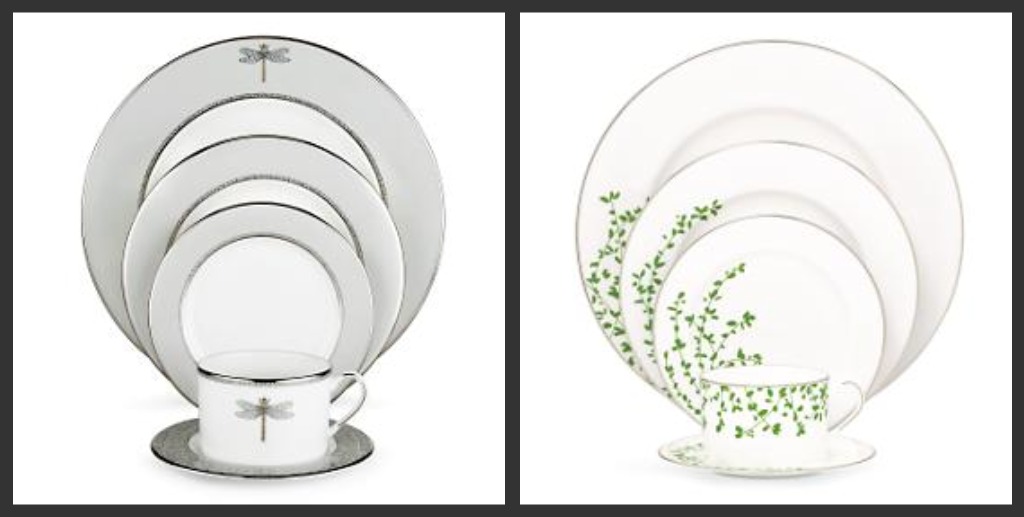
June Lane 139; Gardener Street Green 139

Primrose Hill 139; Noel Alabaster, 139
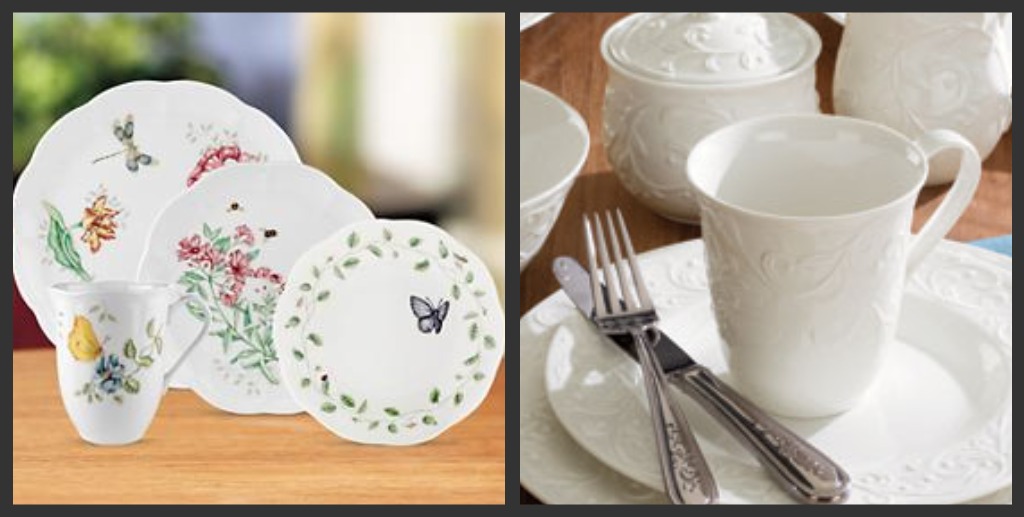
Butterfly Meadow, 49.95; Opal Innocence (each piece purchased separately)
And my absolute favorite...
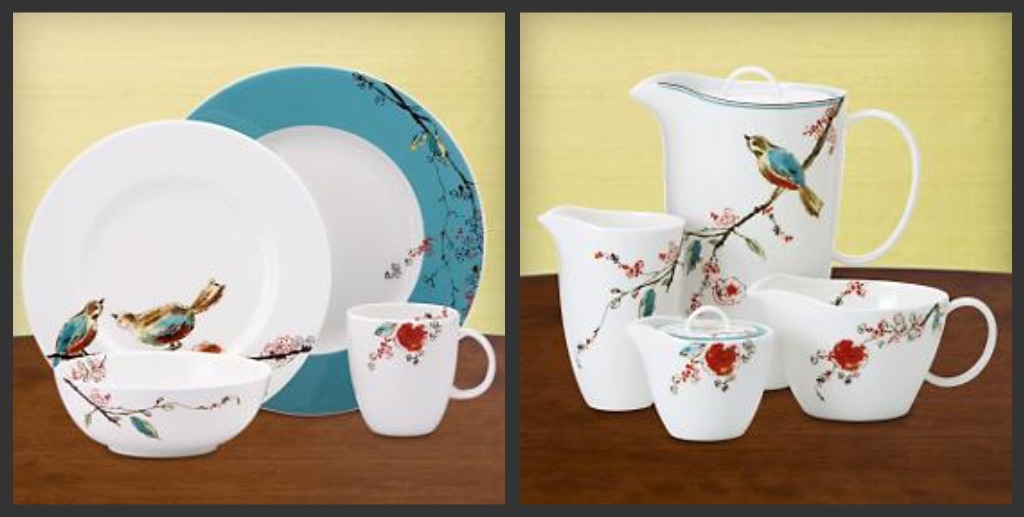
Chirp $134.95; Chirp Pour it On $171.60
follow on Twitter: thecourt_ney
Wednesday, November 17, 2025
Maharam and Paul Smith Collaboration; Take II
It is day two for the Maharam and Paul Smith collection. Today's pattern is Herringbone Stripe. It is truly gorgeous.
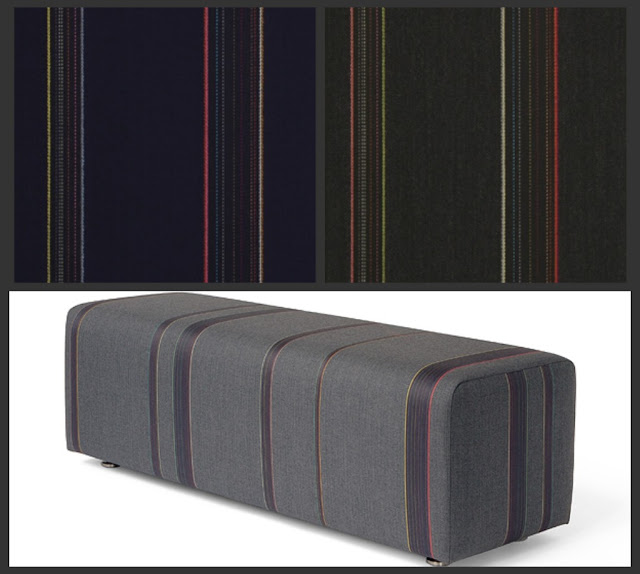
Herringbone Stripe.
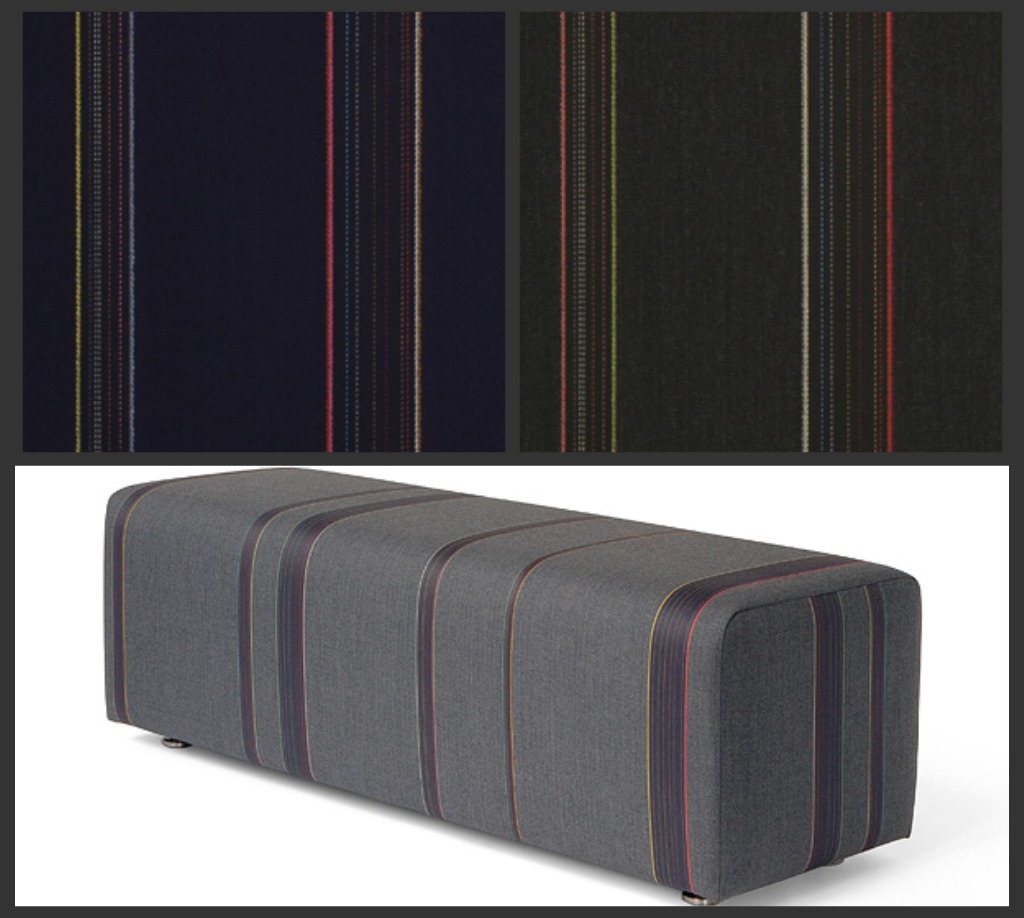
L to R, T to B: Raven, Granite, Espresso, Indigo, Graphite
Bench upholstered with Graphite.
Herringbone Stripe is 100 percent wool and is a Reduced Environmental Impact fabric that comes 57" wide. Herringbone surpasses 40,000 cycles.
follow on Twitter: thecourt_ney
Subscribe to:
Posts (Atom)